Hello
You probably know that during The End of The Sun production we scanned buildings and exhibits from ethnographic museums. But how exactly do “copy and past” of real life buildings into video game 🙂 ?
If you are interested how we did it, in that post we will present whole process, from visiting Ethnographic museum “Skansen Wsi Pogórzańskiej in Szymbark” in Poland to complete 3d objects in the game.
POST CONTAINS A LOT OF GIFS some of them need little bit time to load if you have problem with loading some of them just refresh that webpage.
P.S We are not native English speakers, we try to write our blog posts the best we can. Sorry for all small language mistakes.
__________________________
Wishlist Our Game On Steam Store

________________________
But… 🙂
…Lets Back to our topic. You could see Here comparison between Real photo and in the game view of the same building 🙂

Here is how that building looks in Unity 3d Editor.

…So everything Started one Cloudy Day in Southern Poland in ethnographic museum called “Skansen wsi Pogórzańskiej” in Szymbark.
Why cloudy day You will ask? It’s not by accident 🙂
Cloudy day has perfect light (without hard shadow) to make photogrammetry scan. [Photogrammetry is method of making huge number of photos around real life objects so then computer could make 3d model from that, but we will describe whole that process for a moment 🙂 ]
So Poland has quite good climate for making Photogrammetry.
We have very often cloudy days here, the problem is that most days when there is cloudy weather, It starts to rain. What could break Whole job 🙂
Yes… Unfortunately It was raining this day but only for a while…So We could start our job 🙂

Rain and sunlight are biggest enemy when making photogrammetry 😀 This is why so hard to catch perfect weather.
Creating one building starting from taking photos to ready in game model could take even 2 weeks.
We will explain here step by step why it takes so long .
Ok So Firstly We had to make photos of objects, But not just few photos, For that building there were over 500 photos taken. This is needed especially if objects contains a lot of protruding elements. Our buildings has a lot of these kinds of protruding wooden beams on corners.

There is many rules that you have to keep when making outside objects Photogrammetry:
- You can’t do it with sunlight cause it cast hard shadows and you would like to get most smooth constant light – removing shadows in post-production is very hard thing to do with good effect. So Cloudy weather is a must have here.
- You need to use highest aperture possible on camera to keep whole photo in focus, With low aperture you will get narrow depth of field what is wrong in this case (it will make texture quality blurry at final bake)
- Avoid taking photos when surface is wet and shiny because of that
- Use Long pole to take photos of big or tall objects, We used drone at first but almost every drone has worse camera than our mirror-less camera. That difference in photo quality could be later visible on texture.
- Don’t take photos from really close distance, Of course sometimes You have to do that, to get good scan but try to avoid that if you can.
There is much more of it. To Get more detailed remarks You could read our earlier blog About our characters photogrammetry Here
Ok So After we took photos We put everything into Photogrammetry software (Agisoft Metashape earlier known as Photoscan) as You could see below. Computer calculated photos positions in 3d space and calculated Tie points. It Gives us overall look on object’s shape.

Ok but it not looks too perfect…so What next?
Now we need to calculate “Dense Point Cloud” It is shown on screen below and as You can see it gives pretty good overall look how will be final effect.

( .GIF animation – Could take a little bit time to load )
As you see above We had to remove points that we don’t need in our model, as well as made some manual clean up…But it is still only point of clouds not 3d Model…
…So basing on that very dense Points Cloud computer will calculate 3d Mesh (Model).
That Mesh is pretty heavy 🙂
No it doesn’t weigh 8000 kg (ok we know its a poor joke 😀 ) but it has over 8 milion of faces. (polygons that every 3d model is made from) what makes it heavy to calculate for any PC.

To Give you overall look how much it is – When you play newest 2020 game Your computer is drawing average about 4-5 millions of faces and it contains all 3d models on scene.
So Basically if that house model has 8 Milion faces, We would be able to show You only that One building in our whole game. 🙂
So What Could We do?
We need to make process called “retopology” It’s like creating similar looking much much simpler 3d model basing on actual High Quality Model (with 8k polygons).
It could be done very often automatic way, but not this time. We had to do it manual way.
In case of That buildings it was really hard job. Because many elements needed to be created from nothing. Why?
Because we weren’t able to move many exhibits that were placed around the house, So model wasn’t fully perfectly calculated. Look For Example Here:

We just can’t Take All that wood logs away during making photos in real life so photogrammetry don’t know what is under that. This kind of covered elements like wall under these wood logs need to be modeled manually.
Here Is How looks 3d model after Retopology:

( .GIF animation – Could take a little bit time to load )
Also As You probably noticed that we divided and organized some elements. Walls, roofs, doors, windows, are separate objects. We will explain Why for a moment.
As You saw photogrammetry software baked texture of 3d model basing on photos we took. It is biggest advantage of that method that textures are really unique and looks natural.
For optimization purposes We divided it for few textures:


But Photogrammetry texture isn’t always perfect.
Do you Remember That wood logs? These lying next to the building wall?
Computer don’t know what is behind it so it will just paint wood logs photo as wall texture. So Next step was to fix manually all texture artifacts:

( .GIF animation – Could take a little bit time to load )

But it’s not the end of Our Work.
Now it’s time to add details from our initial High Quality Model into low poly model.
We will do it using normal map. This is some kind of special texture that allows to simulate light behavior in Game Engine giving illusion of details on surfaces
We mixed both – details of colour(albedo) texture with 3d High Poly model details. We Described it here earlier. It’s rather technical
Here is how it looks in Game Engine with Normal maps Turned ON and OFF on walls:

( .GIF animation – Could take a little bit time to load )
Ok So Let’s talk why we divided building into The parts Like Roof, Walls, doors etc.
There were few reasons.
With this kind of organization we could manipulate different elements of buildings. For example we could open The Door, Remove Windows or some interior walls. It is very usefull in game design and gameplay interactions.
You could see that below:

( .GIF animation – Could take a little bit time to load )
Also all walls in interiors were manually modeled. Why?
In the ethnographic museums interiors there is always a huge number of objects(exhibits). This is main reason that without spending weeks on taking these objects out and then putting it back in it is impossible to make photogrammetry.
It’s much easier with almost the same effect to made it manually with mirroring outerior walls inside.
Here below is how finally interior looks. Pretty good. Because inside of building, walls aren’t most important elements. Most important are items that you will find there, so small exhibits that we scanned too. You could read about it in this Blog post 🙂 But probably soon we will write new one only about small exhibits.

( .GIF animation – Could take a little bit time to load )
…there were second more important reason of dividing Interior and Outerior walls…
…Dynamic Weather and snow that we have in our game.
Basically We are using Lux Shader that allows You to generate in Dynamic way snow on objects.
This is Why we needed separate “No Snow” material on interior walls/ floors and “With Dynamic Snow” on these ones Outside.
It works like that:

You Probably also noticed that there are white flowered paintings on that House, It was scanned separate way (From know polish village Zalipie) and pasted on house walls. You could read about it here on Our different Blog Post about Flowers Paintings in Zalipie

We scanned flowered paintings from “Most colorful Village in Europe” – Zalipie and you could read whole blog post about it on our blog 🙂
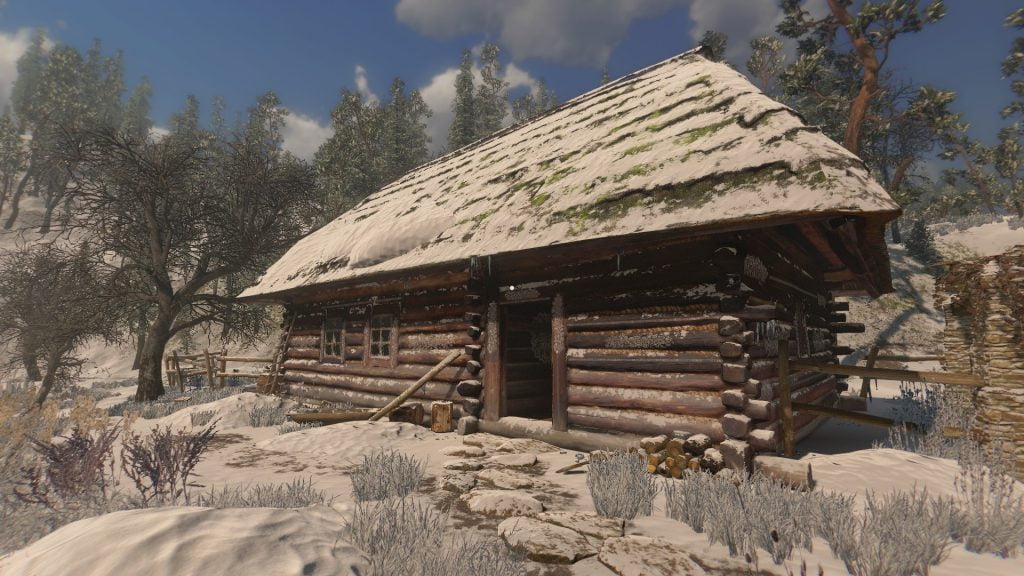
Here is how Home Looks In Unity 3d Editor:
( .GIF animation – Could take a little bit time to load )
Here is how It finally looks In the Game:

We would like to show you few screenshots from different building that You could also know from our Kickstarter Video

Calculating Photos Positions in Software

Baked “not clean” texture

Final look in the game (Click to zoom)
—————
Our project is now Available on Kickstarter. We are collecting funds to be able to finish production of the game.
We have already OVER 60% Of our Goal! So It is highly possible that we will reach our goal soon! You Could help us with that! So We will be able to focus 100% on Creative the game 🙂
It Would Be Awesome if you Could Support us!

You could also add your e-mail to Newsletter so we will send you info about most important events, like game Release, New trailers or Kickstarter campaign Ending hours. We promise we will not spam your inbox.


